Tutorial: Deploy PiGallery2 Photo Gallery
Deploy PiGallery2 photo gallery on Hetzner VPS server
This is my first tutorial that I wrote to Hetzner Tutorials community. It is publised here. This is a personal copy. This particular blog is served from a Hetzner VPS server.
And I of course have a personal Photo Gallery running on a PiGallery2.
Introduction
In this tutorial, we'll deploy a PiGallery2 photo gallery application on a Hetzner VPS Cloud server.
PiGallery2 is a fast (like faster than your PC fast) directory-first photo gallery website, optimised for running on low resource servers, especially on raspberry pi, but it will be lightning fast even on a low end Hetzner Cloud server such as CX23.
A live demo can be seen at: https://pigallery2.onrender.com/
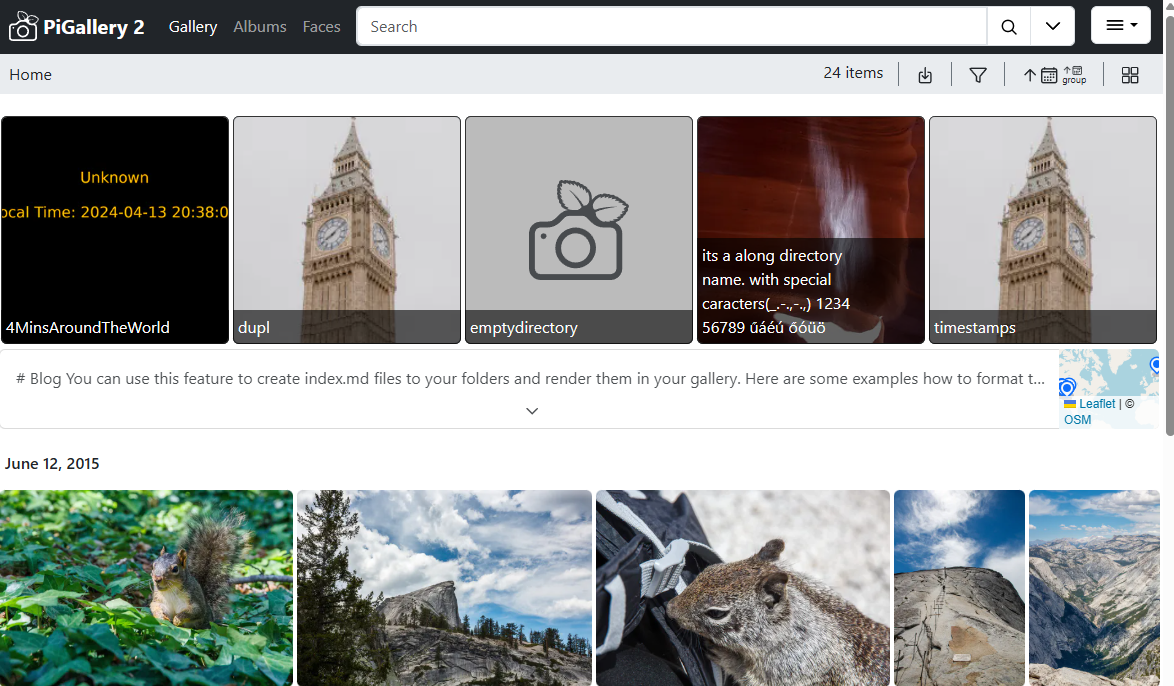
PiGallery2 is open source and free for personal use. PiGallery2 is implemented in Typescript language, and it has a backend that runs on node.js server, and a fluent Single Page Application (SPA) Web Graphical User interface based on JavaScript. There is active development and a big supporting community.
By the end of this tutorial, you'll have a working PiGallery2 photo gallery application deployed on your own server with automatic HTTPS. PiGallery2 is deployed here on a basic Ubuntu Linux system, which should have Apache and node.js installed. PiGallery2 will run on node.js server on port 3000 as system service, and Apache reverse proxy makes the server securely available to the public Internet.
Prerequisites
A Hetzner Cloud server such as CX23 is a good choice for running PiGallery. CX23 will have enough performance to run also many other lightweight web services in parallel. You can use the LAMP stack image to get a working Ubuntu and Apache out of the box. Note that PHP and MySQL are not required for PiGallery but may be useful for running other services in the same server.
To run PiGallery you need to have the following prerequisites. Setting these up is not in scope of this tutorial as there are other tutorials available for this.
- A server with Ubuntu 24.04 and at least 4GB RAM
- sudo privilege
- A domain name you can configure
- Let's Encrypt certbot for https
- Apache web server
Last but not least: you should have some media files in your server.
Step 0: your media files
PiGallery supports viewing jpg, WebP, PNG, SVG, MP4, OGG, OGV, WebM media files. It can easily show 100K files in a directory hierarchy.
It can access any directory mounted on your server for media for which it has read access. Unlike many other web media galleries, the media is not stored to any database. You can simply copy your media to any directory accessible to your server. You can use any methods of your choice to manage those files such as ftp or scp.
If you use a server like Hetzner CX23 you will have 40 GB NVME storage out of box, out of which about 30 GB you could dedicate to media files. If that is not enough, then you can easily extend that up to 10TB with block storage volumes.
PiGallery shows your media in directory hierarchy. It is a good practice to organize your media files into a directory hierarchy by a topics or categories, where each directory has no more than 100 files or sub-directories.
In this tutorial we assume that your media files are located in a directory "/home/exampleuser/mediafiles"
Step 1 install nvm and node
PiGallery2 requires node version 22. It is best to install node using Node Version Manager nvm, which we will install first, and then node and npm, specifically version 22. The latest 24 is too new.
ssh yourserver
# install nvm
sudo curl -o- https://raw.githubusercontent.com/nvm-sh/nvm/v0.39.7/install.sh | bash
#
sudo source ~/.bashrc
# optional: list available versions
nvm ls-remote
# install node 22
nvm install 22
nvm use 22
nvm alias default 22
# verify versions
node -v
npm -v
We install also ffmpeg, that is required for video processing.
sudo apt install ffmpeg
Step 2, install Pigallery release 3.0.0
Pigallery release 3.0.0 is the latest one, released October 2025. A release zip package is available at GitHub , see: https://github.com/bpatrik/pigallery2/releases/tag/3.0.0
Here we use wget to download the zip which we then unzip to a directory "/home/exampleuser/pigallery/rel300". You can chose some other directory of course.
mkdir /home/exampleuser/pigallery
cd /home/exampleuser/pigallery
wget https://github.com/bpatrik/pigallery2/releases/download/3.0.0/pigallery2-release.zip
#
unzip pig2-rel-3.0.0.zip -d rel300
Now we are ready to run the npm install, which will fetch all required node packages automatically.
cd rel300
# note that you need to have nodejs, npm, ffmpeg installed already
npm install
Now you are ready to test that it works
npm start -- --Server-port=3000
This will fire up Pigallery on localhost port 3000. Assuming your server has the IP address 123.123.123.123, you should now be able to see Pigallery running at http://123.123.123.123:3000. You can choose some other port number of course. Note that ports numbered 1024 and higher do not require root access to use, and ports below 1024 are considered privileged and do require root privilege.
This will work only if you have configured your server to allow access port 3000 externally. Or the other way around, you have not blocked port 3000 access with a firewall for example. At a later section this tutorial will show how to harden your server for better security.
Pigallery launched this way will stop running if you give ctrl-c on the terminal. Or if you leave terminal open, it will eventually time out and kill the child process Pigallery. A later section explains how you can make Pigallery a system service that runs always.
Step 3: Configuring PiGallery on first run
On first run PiGallery creates a config.json file, which contains the application configuration. config.json can be edited manually but it is better to use the UI to configure. You find the configuration UI from to right corner hamburger menu: settings once logged in. On first run also a SQLite database is created to store persistent data used by the application.
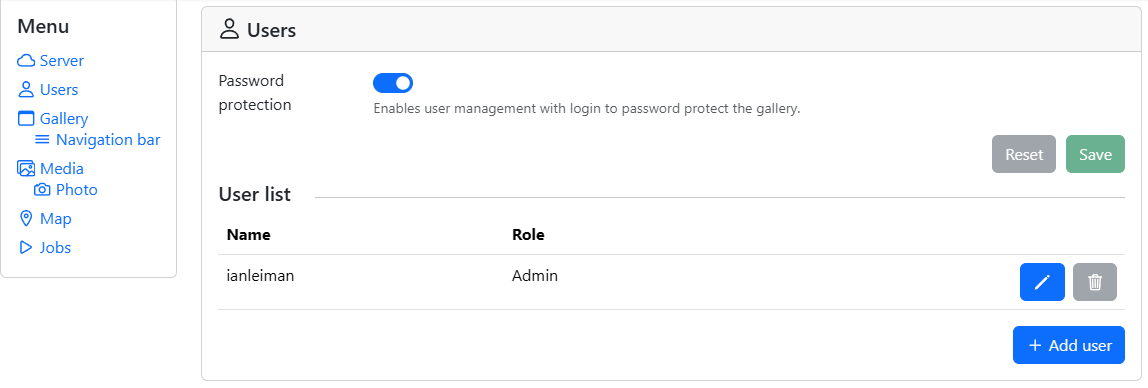
The default Admin account on first run is user: admin pass: admin. You should change this immediately. Login as admin/admin and then go to settings:

-
In Users, click "Add User", give a name other than admin, role Admin and a good password.
-
Once a new Admin-level user added, log out
-
log in with your new Admin-level user credentials
-
open settings
-
In Users: click the trash can to remove the default admin/admin account
-
log out again, and login again
-
now confirm that the default admin/admin account is gone
You can add other accounts too, and it is recommended to add User and
Guest level accounts. Note that the passwords are stored encrypted.
location of your media gallery
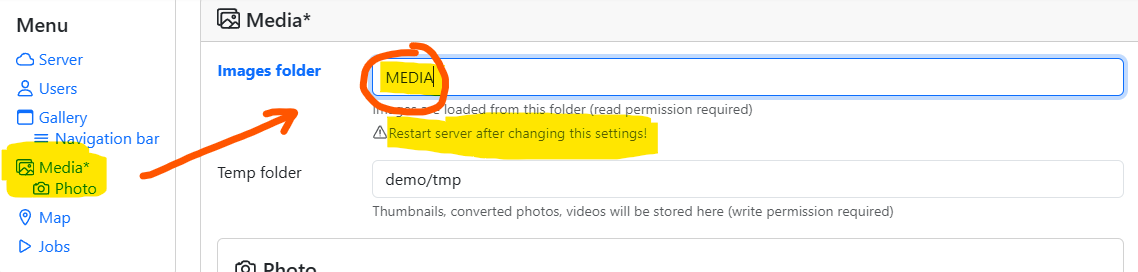
The next important thing to configure is the location of your media gallery. Assuming your media files are located in "/home/exampleuser/mediafiles" and PiGallery is installed at "/home/exampleuser/pigallery/rel300", use following commands to link them. Make sure that you have read access for all of the media files and directories.
cd /home/exampleuser/pigallery/rel300
ln -s "/home/exampleuser/mediafiles MEDIA
In PiGallery settings, Media, enter to "Image Folder": MEDIA. Then
click Save. Click on top menu "Gallery" to view your media.
Full list of configuration options are available at the MANPAGE.md.
Step 4: Configuring PiGallery systemd service
Now we configure PiGallery as a systemd service so that it runs 24/7. This requires sudo privilege.
First we ned to know what the full path to node version 22 is, because PiGallery needs exactly this version. If you installed node using nvm as in previous steps and set version 22 as default, then you can use "which node" command to see the path.
which node
/home/exampleuser/.nvm/versions/node/v22.21.0/bin/node
In case your system default is some other version, then use "nvm which 22"
nvm which 22
/home/exampleuser/.nvm/versions/node/v22.21.0/bin/node
Then we need to edit a file named "/lib/systemd/system/pigallery.service".
sudo nano "/lib/systemd/system/pigallery.service"
Below is an example "/lib/systemd/system/pigallery.service", with following configuration.
-
use server port 3000 (you can change this)
-
run node in production mode (you can also "development" for troubleshooting)
-
PiGallery is to run as user " exampleuser"
-
PiGallery is installed at "/home/exampleuser/pigallery2/rel300/"
-
node version 22 is at "/home/exampleuser/.nvm/versions/node/v22.21.0/bin/node "
# 2025-MM-DD Pigallery2 rel 3.0.0 service
Server-port=3000

[Unit]
Description=Pigallery 3.0.0 photo gallery
After=network-online.target

[Service]
Environment="NODE_ENV=production"
Environment=PORT=3000
Restart=on-failure
User=exampleuser
WorkingDirectory=/home/exampleuser/pigallery2/rel300/
ExecStart=/home/exampleuser/.nvm/versions/node/v22.21.0/bin/node /home/exampleuser/pigallery2/rel300/src/backend/index.js

[Install]
WantedBy=multi-user.target
Now that pigallery.service file is in place, you can command loading the configuration and (re)starting the service pigallery
sudo systemctl daemon-reload
sudo systemctl restart pigallery
# check status
sudo systemctl status pigallery
If it started ok, then you should see Pigallery running at http://<serverip>:3000
Troubleshooting
If Pigallery did not start, then following command will show error messages:
"sudo journalctl -lf -u pigallery"
The most common problem is that node version is wrong, node package installations have failed or "npm install" was a fail.
Some useful commands
Following commands can be used to stop, restart, reload the service and debug problems.
# reload configuration changes
sudo systemctl daemon-reload
# stop the service
sudo systemctl stop pigallery
# start the service
sudo systemctl restart pigallery
# disable
sudo systemctl disable pigallery
# enable
sudo systemctl enable pigallery
# check the configuration
cat /lib/systemd/system/pigallery.service
# edit the configuration
sudo nano /lib/systemd/system/pigallery.service
# check port 3000
lsof -i:3000
# processes related to port 3000
ps -efl | grep "port=3000"
# journal
sudo journalctl -lf -u pigallery
Step 5: Configuring Apache and reverse proxy
Now Pigallery is running at port 3000 as http://<serverip>:3000, but it is more convenient and secure if you could access it like https://mygallery.myserver.com. This can be done assigning your server's IP address to domain name "mygallery.myserver.com" and then configuring Apache web server to proxy that domain name to port 3000.
How to configure DNS records to your server is not in scope of this tutorial as there are other tutorials covering that. Following instructions assume that you have configured "mygallery.myserver.com" to point at your server's IP address.
Test setup
It is a good practice to first test a new Apache virtual host with plain html service before going to a proxy service. You can skip this step if you are confident that your Apache surely works.
Create a file named mygallery.myserver.com.conf in /etc/apache2/sites-available/:
sudo nano /etc/apache2/sites-available/mygallery.myserver.com.conf
Paste the following into the file:
<VirtualHost *:80>
ServerName mygallery.myserver.com
ServerAlias www.mygallery.myserver.com
DocumentRoot /var/www/mygallery

<Directory /var/www/mygallery>
Options Indexes FollowSymLinks
AllowOverride All
Require all granted
</Directory>

ErrorLog ${APACHE_LOG_DIR}/mygallery_error.log
CustomLog ${APACHE_LOG_DIR}/mygallery_access.log combined
</VirtualHost>
Create the Document Root
sudo mkdir -p /var/www/mygallery
sudo chown -R $USER:$USER /var/www/mygallery
Add a simple index.html to test:
echo "<h1>Welcome to MyGallery</h1>" | sudo tee /var/www/mygallery/index.html
Enable the Site and Restart Apache
sudo a2ensite mygallery.myserver.com.conf
sudo systemctl reload apache2
Now at http://mygallery.myserver.com you should your index.html
Enable https
Most browsers will complain about your site being unsecure unless you have https enabled.
Following instructions assumes you will use Let's Encrypt with the certbot tool. If you do not have certbot already, then following commands will install it for you. Skip this if you already have certbot:
sudo apt update
sudo apt install certbot python3-certbot-apache
Run this command to automatically configure HTTPS for your site
sudo certbot --apache -d mygallery.myserver.com
Let's Encrypt certificates expire every 90 days. Certbot sets up a cron job or systemd timer to renew them automatically. You can test it with:
sudo certbot renew --dry-run
Visit https://mygallery.myserver.com in your browser. You should see a secure connection with padlock icon.
Certbot has created a new file /etc/apache2/sites-available/mygallery.myserver.com-le-ssl.conf.
At the beginning of that file you see virtual server for port 443 that is the https port and Apache mod_ssl module is enabled for SSH.
<IfModule mod_ssl.c>
<VirtualHost *:443>
Then at the ned of the file there are the paths to SSL certificates for this site
SSLCertificateFile /etc/letsencrypt/live/mygallery.myserver.com /fullchain.pem
SSLCertificateKeyFile /etc/letsencrypt/live/mygallery.myserver.com /privkey.pem
Include /etc/letsencrypt/options-ssl-apache.conf
Then new lines are added at end of "/etc/apache2/sites-available/mygallery.myserver.com.conf" that will redirect http requests to the https to prevent unsecure access.
RewriteEngine on
RewriteCond %{SERVER_NAME} = mygallery.myserver.com
RewriteRule ^ https://%{SERVER_NAME}%{REQUEST_URI} [END,NE,R=permanent]
This information is needed for the next step.
Proxy configuration
Finally we change the mygallery.myserver.com to connect to PiGallery service running on localhost port 3000. First you need to enable Apache proxy modules and restart apache
sudo a2enmod proxy
sudo a2enmod proxy_http
sudo systemctl restart apache2
Then modify "/etc/apache2/sites-available/mygallery.myserver.com.conf"
# site mygallery.myserver.com
# which is Pigallery2 nodejs app on port 3000
<VirtualHost *:80>
    ServerName mygallery.myserver.com
    ProxyPreserveHost On
    AllowEncodedSlashes On
    ProxyPass / http://localhost:3000/
    ProxyPassReverse / http://localhost:3000/
    <Proxy *>
       Require all granted
       Options None
    </Proxy>

    ErrorLog ${APACHE_LOG_DIR}/mygallery_error.log
    CustomLog ${APACHE_LOG_DIR}/mygallery_access.log combined
RewriteEngine on
RewriteCond %{SERVER_NAME} = mygallery.myserver.com
RewriteRule ^ https://%{SERVER_NAME}%{REQUEST_URI} [END,NE,R=permanent]
</VirtualHost>
Modify "/etc/apache2/sites-available/mygallery.myserver.com-le-ssl.conf".
# site mygallery.myserver.com
# which is Pigallery2 nodejs app on port 3000
<IfModule mod_ssl.c>
<VirtualHost *:443>
    ServerName mygallery.myserver.com
    ProxyPreserveHost On
    AllowEncodedSlashes On
    ProxyPass / http://localhost:3000/
    ProxyPassReverse / http://localhost:3000/
    <Proxy *>
       Require all granted
       Options None
    </Proxy>

    ErrorLog ${APACHE_LOG_DIR}/mygallery_error.log
    CustomLog ${APACHE_LOG_DIR}/mygallery_access.log combined

SSLCertificateFile /etc/letsencrypt/live/mygallery.myserver.com /fullchain.pem
SSLCertificateKeyFile /etc/letsencrypt/live/mygallery.myserver.com /privkey.pem
Include /etc/letsencrypt/options-ssl-apache.conf
</VirtualHost>
Now restart Apache
sudo systemctl restart apache2
Visit https://mygallery.myserver.com to verify that PiGallery is now accessible and running as expected. Now you have your media gallery online.
Final touches
Log into PiGallery and go to settings, at "Server" enter "
https://mygallery.myserver.com".
Then to "Page title": "My amazing Pigallery" or something like it.
Full list of configuration options are available at the MANPAGE.md. There are a lot of things you can configure. Many languages are supported.
Server logs
The file "${APACHE_LOG_DIR}/mygallery_access.log" will contain an access log to your PiGallery.
You can view it for example like this:
source /etc/apache2/envvars
sudo less $APACHE_LOG_DIR/mygallery_access.log
Harden your server (optional)
It is recommended to harden your server for better security by blocking access to all ports that are not in service. Certainly port 3000 should not be accessible for everyone. Following example shows how to block access to all ports except except SSH (22), HTTP (80), and HTTPS (443) using ufw (Uncomplicated Firewall).
sudo ufw enable
sudo ufw allow 22/tcp    # SSH
sudo ufw allow 80/tcp    # HTTP
sudo ufw allow 443/tcp   # HTTPS
sudo ufw default deny incoming
sudo ufw default allow outgoing
sudo ufw default allow outgoing
But maybe you want to keep port 3000 open for your own testing? A secure way to do this is to enable port 3000 access to an IP-address that only you can use, let's say it is 123.123.123.123. Following command does the trick:
sudo ufw allow from 123.123.123.123 to any port 3000 proto tcp
Hardening your server this way prevents hackers to cause undue load to your server and lessen the effect of denial-of-service attacks.